I talk about journaling a LOT (like, a lot), so I often get asked queries about how it works and whether it actually improves my productivity.
I never mind answering it because I LOVE talking about one of my favorite productivity tools. And one question I get quite frequently is, “What’s a bullet journal, and how can it help me get things done?”
Which tells me two main things:
- People are surprised that a simple notebook can be a strong productivity tool
- People are not really sure how to use or start it effectively yet.
If you’re one of those people, hold on! In this post, I am about to show you how bullet journaling can change the way you plan and help “track your past, organize the present, and design the future.”
Moreover, you’ll learn all about bullet journaling for productivity beginners essentials, smart tips, and the common mistakes to avoid for a hassle-free experience.
Ready to explore? Let’s go!
Why One Bullet Journal Beats Multiple Tools #
Switching from multiple apps and planners can be super exhausting. Sticky notes for groceries, a notebook for work, and 3 apps for tasks. Sounds frustrating, doesn’t it?
Yeah, it feels organized at first…. Until it doesn’t.
Until it drains all your energy before you realize it.
Until you begin to spend more time managing your tools than actually doing the stuff.
But when you use one bullet journal, everything lives in a single spot. No more flipping between apps or notebooks, trying to figure out where you wrote that one “important note.”
After all…
One Notebook = One System.
And that means:
- More Clarity → You see all your events, notes, and tasks together without confusion.
- Less Stress → No more tension about forgetting something important.
- Better Balance → Home, work, and personal goals share the same space for tracking.
- More Consistency → One habit is way easier to manage than 5 different ones.
- Goal Setting → Setting and tracking short-, medium-, & long-term goals.
And no, the win is not only the organization. It’s the peace of mind you get with it.
When everything essential is in one bullet journal, you can finally stop hustling and start doing what needs to be done.
Tip: You can also use a bullet journal to improve your work-life balance. In fact, 50% of project managers who use bullet journaling use the same journal for everything, so it’s definitely doable. Just make a room for both and keep it simple.
How to Get Started (The Core Elements & Quick Setup) #
Alright, time to understand a few terms before you actually begin setting up your journal. Here’s the bare minimum you need to start:
- Pencil/Pen: Nothing special required. Just carry a smooth pend you like, and that’s it.
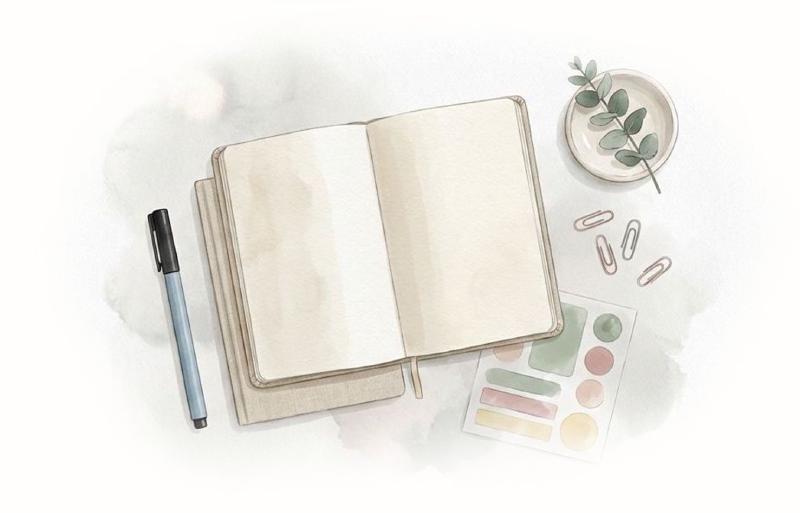
- Notebook: Even a lined or cheap dotted notebook should work for you. The key is to choose something you can dedicate to your journal.
- Stickers: Stickers are also famous among the bullet journal community. Choose whatever sticker color scheme you think would match your style.
- Index Pages: Reserve the first 2-4 pages of your notebook for the Index. Label them as “Index,” and you will simply come back to fill this in as you proceed.
- Future Log: Turn to the next empty pages and then sketch a short Future Log (e.g., 5-6 months at a glance). This will help you jot down upcoming events at a glance.
- Daily/Weekly/Monthly: Decide how you would like to plan. Many people like a monthly calendar at the beginning of each month, then make daily entries regularly.
You might have heard somewhere that a bullet journal should be all color-coded and beautiful. But you know what? That’s not true!
See, you’re writing this for YOU.
Honestly, I start my journal with just a black pen. And when I need to emphasize anything, I may consider a highlighter or a couple of colored markers.
Setting Up Your Bullet Journal for Productivity: Step by Step #
Ready to start your first bullet journal? Here’s how to bullet journal effectively in just 6 quick steps:
Step 1: Buy a Cheap Notebook First #
The best way to start your bullet journaling is without a huge investment. You don’t pay more than $7 for your first journal, just because you’re motivated.
Then try different bullet journal methods on it and see which one works best for you.
Spending less doesn’t mean you have to compromise on paper quality. In fact, there are many options in the market with amazing journal layouts.
So, do a little research first before making your purchase!
Step 2: Know That This Is Your “Learning Notebook” #
As much as you don’t wish to make many “mistakes,” you need to try various layouts before finding the best fit for you.
Don’t worry, even if you don’t nail your “ideal-to-use” setup on the first go.
What makes bullet journaling fun is its ability to modify the layouts every single time you turn the pages.
That’s why you just shouldn’t let your anxiety about the blank page keep you from exploring new possibilities.
Step 3: Create an Idea Folder #
Getting stuck somewhere? Well, a bullet journal cheat sheet would help.
Fortunately, there’s always an option to look for inspiration on Pinterest or Instagram and save whatever layouts’d like.
I personally like to create an Instagram folder for every type of layout, including:
- Weekly pages
- Daily pages
- And collections!!
What’s more, you can take a screenshot of the images and save them to a specific album for bullet journal ideas or bullet journal template choices.
But yes, don’t use another person’s setup as strict rules; what works for them might not work for you. Hence, customization is very important!
Step 4: Start Your Journal Minimally #
Your bullet journal doesn’t even need to be “half of the pages” you view online. Yes, that’s true! Just start with a simple setup you can maintain and add more later.
The best way to minimize your journal is:
- Number your pages if you don’t have a journal with page numbers.
- Set up the index page and future log (in case you don’t use a digital calendar).
- Create your monthly log for the present month.
- Either set up the weekly log for your current week or stick to the daily log.
- Select 1-2 list pages/collections to add next.
Remember, starting is always the hardest. But once you proceed, you’ll know what you need to “add” or “change” as you go.
Step 5: Sketch Your Layouts in Pencil #
For complex layouts where you’re unsure about how to fit everything on a single page, I suggest sketching with a pencil first.
That way, you can ensure you have sufficient space for what you need and redraw whenever needed.
Later, you can go back over and sketch the final layout with a pen.
Step 6: Flag Your Most Referenced Pages #

Without a doubt, the Index keeps things organized. But what? Still, there are some pages you may want to reference every single day, or even many times a day.
As a rule of thumb, use sticky tabs so you can easily flip them anytime. After all, the last thing you wish to do is waste time hunting for a specific page.
The Secret Weapon to Bullet Journaling? Rapid Logging! #
Rapid logging is one of the key strategies for making the most of bullet journaling.
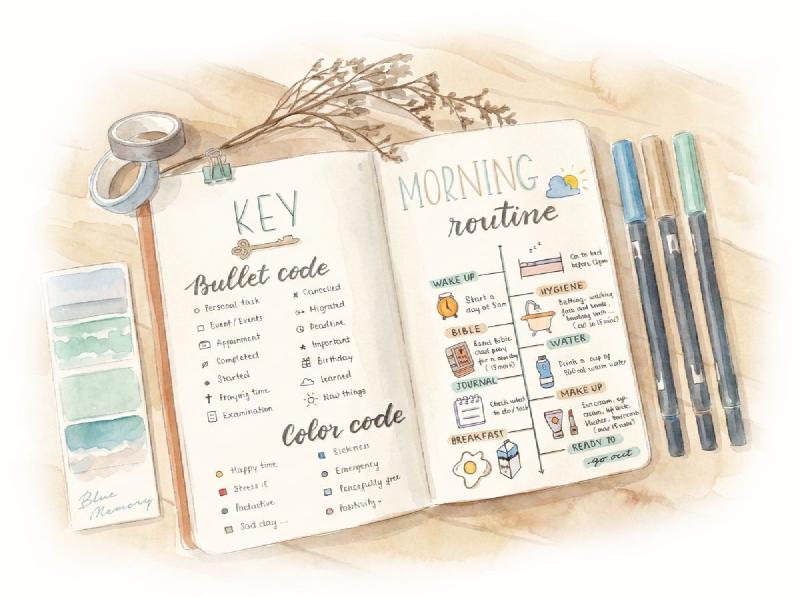
Simply put, this is a “fancy term” for quickly jotting down events, notes, and bullet journal ideas for students using symbols and short phrases. And the core of Rapid Logging is a bullet point.
Here’s how it works:
| Symbol | Entry Type | Meaning |
|---|---|---|
| ● | Task | An item to do (actionable). Example “● Finish quarterly report” |
| ✘ | Task (done) | Task completed. (You’ll mark your tasks with an “✘” when done) |
| > | Task (migrated) | Moved to another day / page. (You’ll change a task to “>” if you roll it forward.) |
| < | Task (scheduled) | Moved to future (e.g. into a Future Log). |
| 〇 | Event | A date-related entry. Example: “〇 Dentist appointment, 3 pm.” |
| ★ or ! | Priority (Signifier) | Mark a high-priority task. (Put it before a bullet.) Example: “★● Submit tax forms.” |
With such symbols, you can look at your pages and immediately notice what’s a to-do, what’s important, and what’s already done. Amazing, right?
The cherry on top is that you don’t even need to memorize all of them at once. Just begin with ●, ✘, and 〇, as they will cover almost 90% of your needs.
Let’s say, if my daily log is for March 10th, it might look like:
● Write blog draft for my website (scheduled for 9 to 11 am)
✘ Meeting w/ Tom (recap notes written)
✘ Buy groceries (eggs, milk, etc.)
〇 Yoga class, 6:30 pm
– Watched a great TED Talk on time management
That’s it!
And this is all it takes to keep you focused on your tasks without writing long pages. As a result, you’re less likely to make excuses for skipping days (it’s just bullets, after all).
5 Common Bullet Journaling Mistakes to Avoid #
Planning to start bullet journaling for productivity beginners soon? Make sure you’re familiar with the common pitfalls and mistakes to avoid. These are the things I’ve seen dozens of beginners run into:
- Comparing Your Journal to Others: Those ideal Instagram spreads? They took literally hours to create, and so much practice. Your journal doesn’t have to look like that to be useful. Just focus on function over embellishments, especially at first.
- Making It Too Big, Too Fast: You don’t need 5 collections, 10 habit trackers, and a 3-page monthly log on day one. Start small, with the basics, and progress slowly.
- Worrying About Mistakes: Wrong data? Smudged ink? Misspelled word? Well, it happens. In the start, you can make plenty of mistakes, but don’t stress about them.
- Skipping the Index: I know it sounds boring… but the Index is gold. Don’t skip it, or you’ll spend ages flipping through pages to find your stuff.
- Abandoning After a Few Days: Like any habit, bullet journaling demands consistency. So, if you use it off-and-on, don’t expect a productivity boost at all.
Conclusion #
At the end of the day, bullet journaling for productivity beginners is not magic dust, but it’s definitely a foolproof system you can use to be more organized and mindful. Generally, it works best when you adapt it to you: use the pieces that help you, and skip the rest.
Follow all the steps I mentioned above, and you’ll be miles ahead of the overwhelm curve. But understand that the real “productivity” goes far beyond the pages. Make sure you’re clear about your goal and take steps to improve. That’s the real win!
So what are you waiting for? Now, go forth and bullet journal like a pro. And remember, consistency is more important than creativity. Let your BuJo be your brain’s hard drive, and trust me, your future self will be super joyful.
Happy journaling!
Frequently Asked Questions #
Q1. How does the Bullet Journal method work? #
Bullet journaling for productivity is a constant process of reflection, refinement, & documentation. As we Bujo, we become more familiar with what we do and whether we need to keep doing it. Does it make my life better? If not, how can I do it less or skip it?
Q2. What pages should I include in my first bullet journal? #
For your very first bullet journal, you need to include an index, a daily log, a monthly log, a future log, and a few collections, such as goal lists or habit trackers. Design it as you want, and add more pages only if you feel you’re ready to handle more.
Q3. What supplies do I need for bullet journaling for beginners? #
No fancy supplies are required. Only a basic bullet journal setup would do, which involves a highlighter, pen, and notebook. You can also use optical tools like washi tape or stickers for color-coding or decoration purposes.
Q4. How much time does a beginner need for bullet journaling? #
Beginners generally need 5 to 15 minutes per day to maintain a functional, effective bullet journal, focusing on daily rapid logging. Always start simple, and avoid any time-consuming bullet journal ideas aesthetic to stay consistent.